How to Create an Ice Text Effect with Photoshop
In this tutorial, you'll learn how to create an ice effect completely from scratch using special Photoshop Brushes. Some time ago playing with Photoshop and trying to make an ice effect I discovered that "dead trees" can simulate very well the ice's "veins" giving a cool feeling to an image. I'm not going for realism here, but I do like the final effect for this tutorial. I used some text as reference, but this effect can be applied to any shape you want and can add some great style. Let's get started!
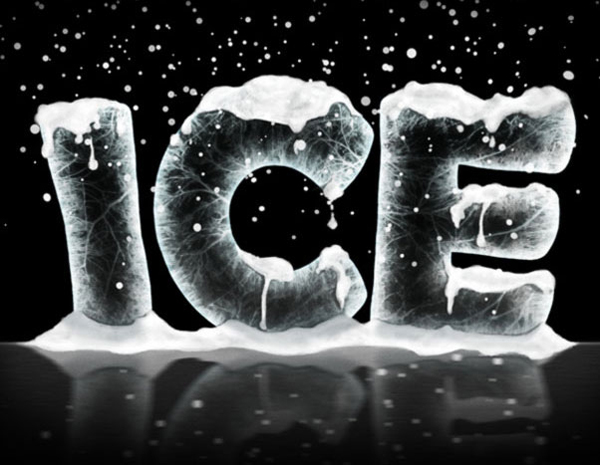
[h=3]Final Image PreviewTake a look at the image we'll be creating. Want access to the full PSD files and downloadable copies of every tutorial, including this one? Join Psd Plus for just $19/month. You can view the final image preview below.
[h=3]IntroductionTo make this image look more interesting I added some snow falling down and some dropping down from the letters. The first thing to do before opening Photoshop is to install a few Brush sets. If you don't know how to, follow this very good guide which tells you how to install extra presets in your Adobe Photoshop.
As mentioned, this effect is made from scratch, but I used two useful sets of tree Brushes: this one and this one (the set n°17 from the top) from this list. Thank you very much to pixelgratis and Velavan. For the text we'll use a special font called Berlin Sans FB in Bold version.
This tutorial is easy, made with basic techniques, can be done with Adobe Photoshop CS2 or superior and you don't need a pen tablet, a mouse is good enough. OK, now let's get working!
[h=3]Step 1Create a document of the size you want, staying near to 1600 pixels by 1200 pixels, 300 dpi resolution (if you are going to print it) or 72 dpi if you're going to publish it on the Web. We can use 72 dpi to keep our document tidy and work faster. Set the Foreground color to black #000000 and then press Alt + Delete to fill the "Background" layer with a black color. Our "Background" layer become black with a touch!
Now choose #ff0000 as our Foreground color and type some text with the Horizontal Type Tool (T) using the settings shown below and the font we previously downloaded. We're using a red color just to create some contrast with the black background and the white effects that will come next.

[h=3]Step 2Now double-click on the Layer thumbnail (or go to Layer > Layer Style > Stroke...) and choose #ff0000 for the color and set the Stroke at 15 pixels. This way we're making the text more rounded and fatty to avoid rough edges.

[h=3]Step 3Create a New Layer by clicking Command + Shift + N, then pick the Brush Tool (B), right-click with your mouse and finally load the new sets of Brushes by clicking on the little black arrow (look below). After choosing Load Brushes... browse to your Presets folder and then to the Brushes folder to load the Brushes. Load all the three sets we previously downloaded, as we're going to need some variety to create the ice effect.

[h=3]Step 4Before beginning the work with Brushes, let's see how to modify the Angle of the Brush selected because it's essential for the next steps. Press F5 to open the Brushes Window: using the Angle option you can rotate the Brush you're using. Allow the Smoothing option for a softer Brush.

[h=3]Step 5Now click near the red area of the letters, everything which happens outside of that area is not important, and we can erase it later. Use your creativity to make something which should look like cracks in the ice - you have a lot of Brushes available to work with.

[h=3]Step 6
In this tutorial, you'll learn how to create an ice effect completely from scratch using special Photoshop Brushes. Some time ago playing with Photoshop and trying to make an ice effect I discovered that "dead trees" can simulate very well the ice's "veins" giving a cool feeling to an image. I'm not going for realism here, but I do like the final effect for this tutorial. I used some text as reference, but this effect can be applied to any shape you want and can add some great style. Let's get started!
[h=3]Final Image PreviewTake a look at the image we'll be creating. Want access to the full PSD files and downloadable copies of every tutorial, including this one? Join Psd Plus for just $19/month. You can view the final image preview below.
[h=3]IntroductionTo make this image look more interesting I added some snow falling down and some dropping down from the letters. The first thing to do before opening Photoshop is to install a few Brush sets. If you don't know how to, follow this very good guide which tells you how to install extra presets in your Adobe Photoshop.
As mentioned, this effect is made from scratch, but I used two useful sets of tree Brushes: this one and this one (the set n°17 from the top) from this list. Thank you very much to pixelgratis and Velavan. For the text we'll use a special font called Berlin Sans FB in Bold version.
This tutorial is easy, made with basic techniques, can be done with Adobe Photoshop CS2 or superior and you don't need a pen tablet, a mouse is good enough. OK, now let's get working!
[h=3]Step 1Create a document of the size you want, staying near to 1600 pixels by 1200 pixels, 300 dpi resolution (if you are going to print it) or 72 dpi if you're going to publish it on the Web. We can use 72 dpi to keep our document tidy and work faster. Set the Foreground color to black #000000 and then press Alt + Delete to fill the "Background" layer with a black color. Our "Background" layer become black with a touch!
Now choose #ff0000 as our Foreground color and type some text with the Horizontal Type Tool (T) using the settings shown below and the font we previously downloaded. We're using a red color just to create some contrast with the black background and the white effects that will come next.
[h=3]Step 2Now double-click on the Layer thumbnail (or go to Layer > Layer Style > Stroke...) and choose #ff0000 for the color and set the Stroke at 15 pixels. This way we're making the text more rounded and fatty to avoid rough edges.
[h=3]Step 3Create a New Layer by clicking Command + Shift + N, then pick the Brush Tool (B), right-click with your mouse and finally load the new sets of Brushes by clicking on the little black arrow (look below). After choosing Load Brushes... browse to your Presets folder and then to the Brushes folder to load the Brushes. Load all the three sets we previously downloaded, as we're going to need some variety to create the ice effect.
[h=3]Step 4Before beginning the work with Brushes, let's see how to modify the Angle of the Brush selected because it's essential for the next steps. Press F5 to open the Brushes Window: using the Angle option you can rotate the Brush you're using. Allow the Smoothing option for a softer Brush.
[h=3]Step 5Now click near the red area of the letters, everything which happens outside of that area is not important, and we can erase it later. Use your creativity to make something which should look like cracks in the ice - you have a lot of Brushes available to work with.
[h=3]Step 6


