-
توجه: در صورتی که از کاربران قدیمی ایران انجمن هستید و امکان ورود به سایت را ندارید، میتوانید با آیدی altin_admin@ در تلگرام تماس حاصل نمایید.
You are using an out of date browser. It may not display this or other websites correctly.
You should upgrade or use an alternative browser.
You should upgrade or use an alternative browser.
آموزش کامل Excel 2007 - EN
- شروع کننده موضوع A M I R
- تاریخ شروع
Lesson 1: Entering Text and Numbers
[h=4]Alternate Method: Editing a Cell by Using the Formula Bar
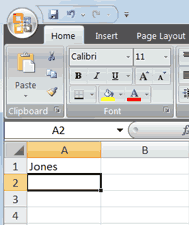
You can also edit the cell by using the Formula bar. You change "Jones" to "Joker" in the following exercise.
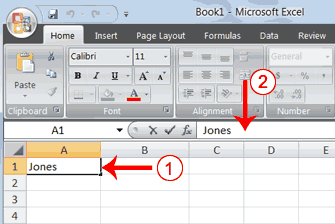
- Move the cursor to cell A1.
- Click in the formula area of the Formula bar.
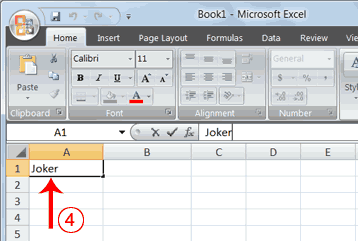
- Use the backspace key to erase the "s," "e," and "n."
- Type ker.
- Press Enter.
Lesson 1: Entering Text and Numbers
[h=4]Alternate Method: Edit a Cell by Double-Clicking in the Cell
You can change "Joker" to "Johnson" as follows:
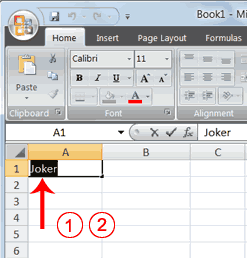
- Move to cell A1.
- Double-click in cell A1.
- Press the End key. Your cursor is now at the end of your text.
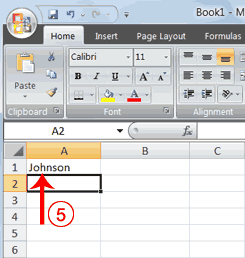
- Use the Backspace key to erase "r," "e," and "k."
- Type hnson.
- Press Enter.
Lesson 1: Entering Text and Numbers
[h=3]Save a File
This is the end of Lesson1. To save your file:
- Click the Office button. A menu appears.
- Click Save. The Save As dialog box appears.
- Go to the directory in which you want to save your file.
- Type Lesson1 in the File Name field.
- Click Save. Excel saves your file.
Lesson 2: Entering Excel Formulas and Formatting Data
Lesson 1 familiarized you with the Excel 2007 window, taught you how to move around the window, and
how to enter data. A major strength of Excel is that you can perform mathematical calculations and format
your data. In this lesson, you learn how to perform basic mathematical calculations and how to format text
and numerical data. To start this lesson, open Excel.
Lesson 2: Entering Excel Formulas and Formatting Data
Set the Enter Key Direction
In Microsoft Excel, you can specify the direction the cursor moves when you press the Enter key. In
the exercises that follow, the cursor must move down one cell when you press Enter. You can use
the Direction box in the Excel Options pane to set the cursor to move up, down, left, right, or not at
all. Perform the steps that follow to set the cursor to move down when you press the Enter key.
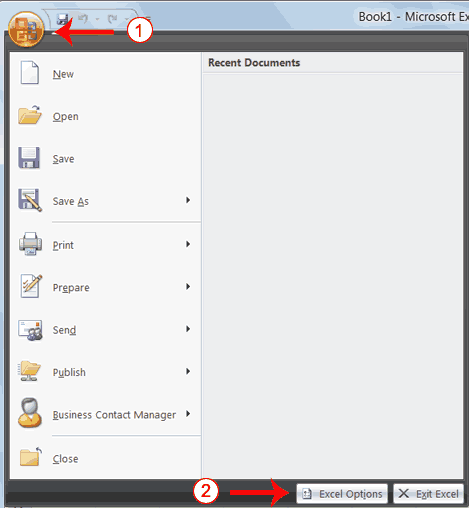
- Click the Microsoft Office button. A menu appears.
- Click Excel Options in the lower-right corner. The Excel Options pane appears.
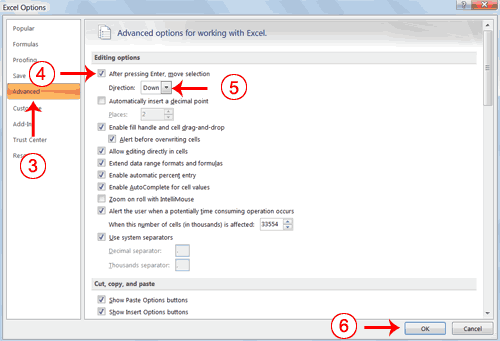
- Click Advanced.
- If the check box next to After Pressing Enter Move Selection is not checked, click the box to check it.
- If Down does not appear in the Direction box, click the down arrow next to the Direction box and then click Down.
- Click OK. Excel sets the Enter direction to down.
Lesson 2: Entering Excel Formulas and Formatting Data
[h=3]Perform Mathematical Calculations
In Microsoft Excel, you can enter numbers and mathematical formulas into cells. Whether you
enter a number or a formula, you can reference the cell when you perform mathematical calculations
such as addition, subtraction, multiplication, or division. When entering a mathematical formula, precede
the formula with an equal sign. Use the following to indicate the type of calculation you wish to perform:
+ Addition
- Subtraction
* Multiplication
/ Division
^ Exponential
In the following exercises, you practice some of the methods you can use to move around a
worksheet and you learn how to perform mathematical calculations. Refer to Lesson 1 to
learn more about moving around a worksheet.
Lesson 2: Entering Excel Formulas and Formatting Data
[h=4]EXERCISE 1
[h=4]Addition
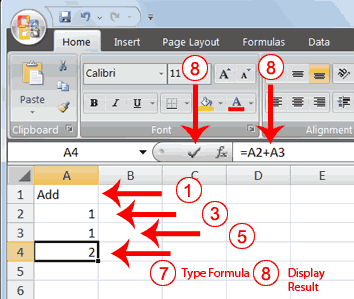
- Type Add in cell A1.
- Press Enter. Excel moves down one cell.
- Type 1 in cell A2.
- Press Enter. Excel moves down one cell.
- Type 1 in cell A3.
- Press Enter. Excel moves down one cell.
- Type =A2+A3 in cell A4.
- Click the check mark on the Formula bar. Excel adds cell A1 to cell A2 and displays the result in cell A4. The formula displays on the Formula bar.
Note: Clicking the check mark on the Formula bar is similar to pressing Enter. Excel
records your entry but does not move to the next cell.
Lesson 2: Entering Excel Formulas and Formatting Data
[h=4]Subtraction
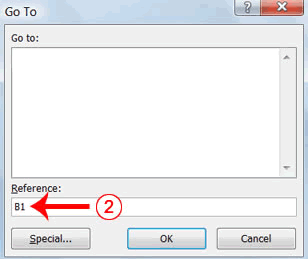
- Press F5. The Go To dialog box appears.
- Type B1 in the Reference field.
- Press Enter. Excel moves to cell B1.
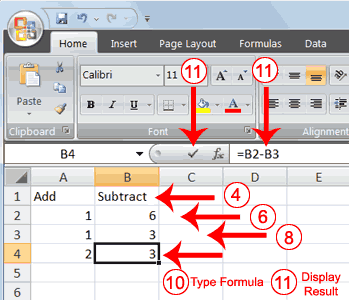
- Type Subtract.
- Press Enter. Excel moves down one cell.
- Type 6 in cell B2.
- Press Enter. Excel moves down one cell.
- Type 3 in cell B3.
- Press Enter. Excel moves down one cell.
- Type =B2-B3 in cell B4.
- Click the check mark on the Formula bar. Excel subtracts cell B3 from cell B2 and the result displays in cell B4. The formula displays on the Formula bar.
Lesson 2: Entering Excel Formulas and Formatting Data
[h=4]Multiplication
- Hold down the Ctrl key while you press "g" (Ctrl+g). The Go To dialog box appears.
- Type C1 in the Reference field.
- Press Enter. Excel moves to cell C1
- Type Multiply.
- Press Enter. Excel moves down one cell.
- Type 2 in cell C2.
- Press Enter. Excel moves down one cell.
- Type 3 in cell C3.
- Press Enter. Excel moves down one cell.
- Type =C2*C3 in cell C4.
- Click the check mark on the Formula bar. Excel multiplies C1 by cell C2 and displays the result in cell C3. The formula displays on the Formula bar.
Lesson 2: Entering Excel Formulas and Formatting Data
[h=4]Division
- Press F5.
- Type D1 in the Reference field.
- Press Enter. Excel moves to cell D1.
- Type Divide.
- Press Enter. Excel moves down one cell.
- Type 6 in cell D2.
- Press Enter. Excel moves down one cell.
- Type 3 in cell D3.
- Press Enter. Excel moves down one cell.
- Type =D2/D3 in cell D4.
- Click the check mark on the Formula bar. Excel divides cell D2 by cell D3 and displays the result in cell D4. The formula displays on the Formula bar.
When creating formulas, you can reference cells and include numbers. All of the following formulas are valid:
=A2/B2
=A2/B2
=A1+12-B3
=A2*B2+12
=24+53
Lesson 2: Entering Excel Formulas and Formatting Data
[h=3]AutoSum
You can use the AutoSum button

press the AutoSum button

on the Formula bar or press the Enter key, Excel adds the numbers. If Excel's guess as to which numbers you want
to add is wrong, you can select the cells you want.
Lesson 2: Entering Excel Formulas and Formatting Data
[h=4]EXERCISE 2
[h=4]AutoSum
The following illustrates AutoSum:
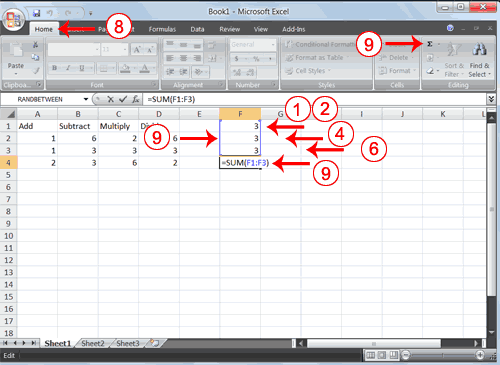
- Go to cell F1.
- Type 3.
- Press Enter. Excel moves down one cell.
- Type 3.
- Press Enter. Excel moves down one cell.
- Type 3.
- Press Enter. Excel moves down one cell to cell F4.
- Choose the Home tab.
- Click the AutoSum button
in the Editing group. Excel selects cells F1 through F3 and enters a formula in cell F4.

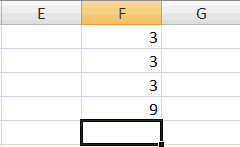
- Press Enter. Excel adds cells F1 through F3 and displays the result in cell F4.

